Build a Calculator using HTML and JavaScript: A Hands-On Guide
Step into the realm of Web Development and unleash your coding powers as we embark on this journey to build a simple functional calculator!
Welcome to this hands-on guide to creating a calculator from scratch using HTML and JavaScript only. The only pre-requisite you need is a computer and an internet connection, but I doubt that would be a problem, otherwise, how are you reading this? 😂 Let's not waste any more time, and dive into the dynamics of frontend web development!
Step 1: Setup HTML Boilerplate
Boilerplates are sections of code that are repeated in projects multiple times. In HTML5, the basic outline is always the same, with minimal to no variations.
Below, is one of the simple boilerplate HTML codes.
<html>
<head>
    <title> Calculator Web </title>
</head>
<body>
    <!-- Main HTML5 Code -->
</body>
</html>
Once, you have done it, you now have a simple basic functional site with nothing on it.
Step 2: Create our Basic Calculator
We will be using a <main> block in HTML to create a container block where we can create our basic calculator. [ inside <body> ]
<body>
    <main>
    ...
    </main>
</body>
Now, add an <input> tag where we will be displaying the result, and add buttons for all the 10 numbers, we know.
<main>
    <!-- Input Bar for the Result -->
    <input type="text" id="result" readonly>

    <!-- Buttons for the Numbers -->
    <button onclick="append('1')">1</button>
    ...
    <button onclick="append('9')">9</button>
    <button onclick="append('0')">0</button>
</main>
append('1') refers to the function it performs whenever the button is clicked. We will be writing the code for it afterwards. Now, you might see the buttons all displaying in a single line, which ain't that great.
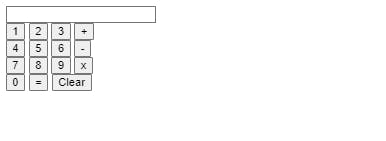
So, use <div> to wrap the buttons in sets of 3, resulting in the code below. If you don't understand anything written below, ask me in the comments!
<main>
    <input type="text" id="result">
    <div>
        <button onclick="append('1')">1</button>
        <button onclick="append('2')">2</button>
        <button onclick="append('3')">3</button>
        <button onclick="append('+')">+</button>
    </div>
    <div>
        <button onclick="append('4')">4</button>
        <button onclick="append('5')">5</button>
        <button onclick="append('6')">6</button>
        <button onclick="append('-')">-</button>
    </div>
    <div>
        <button onclick="append('7')">7</button>
        <button onclick="append('8')">8</button>
        <button onclick="append('9')">9</button>
        <button onclick="append('*')">x</button>
    </div>
    <div>
        <button onclick="append('0')">0</button>
        <button onclick="calculate()">=</button>
        <button onclick="clearall()">Clear</button>
    </div>
</main>
For the = button we used a calculate() function, unlike other buttons since we want a function that can calculate the current values in the display input.
Step 3: Write JavaScript
You can add JavaScript to HTML code in many ways. But for this, we are covering two ways:
Internal JavaScript (via
scripttag)External JavaScript
For this guide, we are gonna be using Internal JavaScript. So, let's start!
First, we get the values in the result id in <input> tag as a variable in JavaScript.
const result = document.getElementById('result');
Now, let's add new functions for each button action. For the above HTML code, 3 functions have to be added:
append()- Append values in the resultcalculate()- Evaluate the values in the resultclearall()- Clears the values in the result
Append()
We have to take an input variable as a parameter and then, append (or specifically just add) the values to the existing items in the result
function append(value){
    result.value += value;
}
Calculate()
Now, we need to calculate the values that are existing in the result or input tag.
We then have to evaluate the values. But if the values cause an error, we display the result as an Error
function calculate() {
    try {
        result.value = eval(result.value);
    } catch(error) {
        result.value = "Error";
    }
}
Clearall()
Now, if there's an error or if you want to reset the values, you can use this function to clear the values existing in the display result.
function clearall() {
    result.value = "";
}
Make sure the naming of functions is not conflicting with built-in JS functions or existing functions. (So,
clearwon't work)
If you did, as followed above, you will have the script tag similar to one below.
<body>
    <main>...</main>
    <script>
    const result = document.getElementById('result');
    function append(value){
        result.value += value;
    }

    function calculate() {
        try {
            result.value = eval(result.value);
        } catch(error) {
            result.value = "Error";
        }
    }

    function clearall(){
        result.value = "";
    }
    </script>
</body>
Done!
You can now, run the website or host it anywhere else. You can also deploy this code at codepen to check how it works.
Below is the basic functional calculator that you created using HTML and JavaScript.

If you like the hands-on guide, make sure to follow "The Abel Experiment" to support us further!

