


Tic Tac Toe is a classic game that is enjoyed by people of all ages. I still do remember the times at school, when I used to scribble tictactoe behind our class notebooks. Besides all the stories you've had, this blog post is aimed to bootstrap you with the basics on how to utilize Python Tkinter to your advantage to build a tic tac toe from scratch!
Basic Prerequisites
Learn the basics of how Python works [Refer to Python Series]
Understanding how libraries are used
Step 1: Install & Import
Install the necessary libraries, ie. tkinter and customtkinter
pip install customtkinter
Import the customtkinter python library
# main.py ~ Import the libraries
from customtkinter import *
Step 2: Creating the app
Now, set the appearance mode to either light or dark and set the default color scheme, whichever you prefer. By default, it is light mode and blue color scheme.
# Stylize the appearance [Optional] ~ Aesthetics
set_appearance_mode('dark') # By default, it's white
set_default_color_theme('green') # By default, it's blue
Initialize the app by creating an object using the CTk() class.
We will also be giving the title of the container as "TicTacToe" for fun obviously.
# Creating an App Object
app = CTk()
app.title('Tic Tac Toe') # Optional

# Keep the below statement at the end [Recommended]
app.mainloop()
Initialize variables that we will be using throughout the game
# Initialize the variables
player = "X"
board = [
    ["","",""],
    ["","",""],
    ["","",""],
]
Step 3: Designing the Board
Let's create buttons to be placed as a tic-tac-toe board.
For this, the most simple way to do this is to create two for loops and store the buttons inside a button_row tuple, and then use that to place using a grid.
# Initialize the buttons, for configuration later on
buttons = []
for row in range(3): # for each row
    button_row = []
    for col in range(3): # for each column
        button = CTkButton(
            app,
            text = f"{board[row][col]}",
            width = 50,
            command = lambda row=row, col=col:
                update_board(board, row, col) # Handling the button clicks
        ) # Creates a button object
        button.grid(
            row=row, column=col,
            padx=2,pady=3
        ) # Design and Position the button
        button_row.append(button)
    buttons.append(button_row)
Here, CTkButton() is a pre-existing class, with which we are creating a button object. This button object is then placed using the .grid() method of the Tkinter module.
Once, that's done, we store the button reference inside a tuple called buttons!
You can understand more by printing it out in the output.
Inside the Button class, there is a lambda function for the updation of the board as each button is pressed. If you need help to understand what lambda is, refer to the Python Series.
Step 4: Handling Button Clicks
Continuing the lambda function we created in Step #3, we first check for a position in the board matrix that we had initialized in Step #2.
# Function to update board
def update_board(board, i, j):
    global player # Globalize the player variable

    # Checks if a player already exists on the board
    if board[i][j] == '':
        board[i][j] = player # Sets the board
        buttons[i][j].configure(text=player) # Sets the button

        # Change the player
        player = "O" if player == "X" else "X"
Also, inside the if condition, we will be updating the board variable, as we are using it as a reference for the positions filled and vacant. We will also configure the player inside the button itself.
Most importantly, since Tictactoe is a turn-based game, we have to change the current player to the new one.
Step 5: Checking for a Winner
If you understand how tictactoe works, you will find out that there are 8 possible combinations for a win in a game. (against your friend, to defeat them and show domination)
Before you see the code, try to figure out how to do it yourself using the below raw diagram
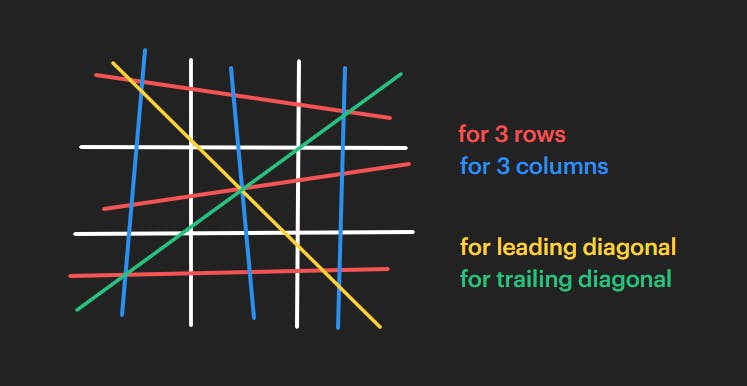
Let's jump on a simple if conditions code now!
# Function to check for a win
def check_win(player):
    for row in range(3): # For every row (3)
        if (
            board[row][0] == board[row][1] == board[row][2] == player
            and board[row][0] != ""
        ):
            return True

    for col in range(3): # For every column (3)
        if (
            board[0][col] == board[1][col] == board[2][col] == player
            and board[0][col] != ""
        ):
            return True

    if (
        board[0][0] == board[1][1] == board[2][2] == player
        and board[0][0] != ""
    ): # For leading diagonal
        return True

    if (
        board[0][2] == board[1][1] == board[2][0] == player
        and board[0][2] != ""
    ): # For trailing diagonal
        return True

    return False # Returns a failed check
Step 6: Who's the Winner?
The most important part of a rivalry, is WHO WON?
That's exactly what this step's supposed to show. To show the winner info, there are several different ways. Many tutorials prefer using a different window as a popup showing who won. But in this tutorial, you'll be using a label, which not just shows who won, but also whose current turn is going on in-game.
To implement this, we will use CTkLabel() class of customtkinter library.
# Create a footer label
msg = CTkLabel(
    app, # Window to place the label
    text = f"Player {player}", # Text to be shown
    font = ("Poppins", 15), # Custom font [Optional]
    width = 100 # Style [Optional] ~ Aesthetics
)
# Positioning below buttons
msg.grid(row=3,column=0,columnspan=3)
^ The comments are pretty clear, if more doubts arise, ask in the comments!
We also have to configure the name changes each turn happens, and also at the end. So, we go inside the update_board() once again.
def update_board(board, i, j):
    ...
    if board[i][j] == '':
        if check_win(player):
            msg.configure(
                text = f"{player} won"
            ) # Change the label at the end
            return

        player = "O" if player == "X" else "X"
        msg.configure(text=f"Player {player}") # Change player name each turn
Step 7: Voila!
Run the Python file, however, you wish. Either use the CLI command,python main.py or use an IDE
You should get the below output [hopefully]
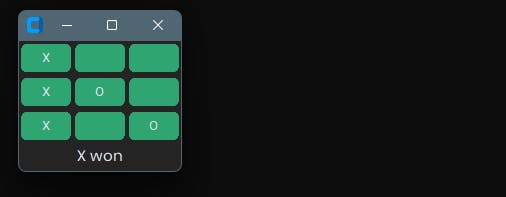
It actually works.
Yes, it works, and if it doesn't for you. You have 3 options:
Smash your computer and throw it out of your window
Compare your code with the Source Code of this project to understand what went wrong. Also, debugging the errors is a good way to understand the inner linings of how interpreters work.
Source Code: Github GISTOR Simply ask in the comments!
I guess, we reached the end of our journey! If you like what you read, then do support me by giving the post a like and a follow!
Keep Experimentin'
Source Code
*Don't Ctrl-C Ctrl-V